
This article walks you through how to upload many activity records, for multiple trackers, at the same time using a single spreadsheet.
Accessing the Batch Upload Feature
The batch entry functionality is accessible from any level node in your account. Navigate to this node and click on the Batch Upload button in the sidenav. You will be able to load data to all trackers on or below where you access the Batch Upload Feature.
You'll be taken to the file upload page where you'll see a number of large blue buttons corresponding to the various file formats supported. The notes immediately following will help you choose the appropriate format to best accommodate your specific file. Any uploaded file must be in CSV format. See the section at the end of this article titled General Notes on CSV Files for notes on CSV formatting in general.
1. Multi-Tracker Format
This format is best suited for entering data for multiple activity records spanning multiple dates, for one or more trackers.
- Refer to the Sample File illustration below.
- There must be one row per activity record.
- A header row is not required. If a header is present, the first column in the header must contain the textTracker and nothing else.
- Each row (other than the optional header) must contain either three or four values, separated by commas, as follows:
- Tracker name - a text string representing the tracker to which the activity record should be attached. The application will attempt to match names for which an exact match is not found.
- Activity date - a text string that specifies the date of the activity record. Either of the following formats are acceptable: "MM/DD/YYYY" or "MM/DD/YY".
- Activity quantity - a numeric value specifying the activity amount.
- Activity cost - a numeric value specifying the cost in the correct denomination for the tracker. A currency symbol (such as a dollar sign) is allowed. If a tracker is configured to track cost with each activity record, the corresponding rows in the CSV file must include a cost value. Otherwise, the cost value should be blank.
- Numeric values may contain a single decimal point and commas may be used to separate thousands. (See the note in the previous section regarding commas in CSV files).
Here's a sample of what the first few rows of an appropriately formatted Multi-Tracker CSV file might look like:

2. Utility Manager CSV Format
This format is best suited for variations on output from Utility Manager, in which there are multiple trackers, each with a single activity record, all for the same date. You might use it for example, to do a monthly upload for the latest activity data across a large set of trackers.
- The file must contain a single header row with a reference to the facility name, the specific utility and units of consumption for that utility.
- All records are expected to be for the same date (which you will have an opportunity to specify before uploading).
- Generally, each subsequent row is expected to hold data for multiple utilities at a single facility (and therefore, for multiple trackers).
- The first column in each row is expected to contain a reference to a facility or site.
- Subsequent columns in the row are expected to contain the data for that facility’s utilities, with the specific utility (and units of consumption) identified in the column headers.
- There must be two columns for each utility, the first specifying the units consumed and the second specifying the cost of consumption. If the tracker referenced is not configured to track cost, the corresponding cost column must be blank.
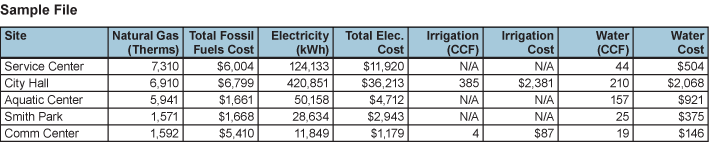
Here's a sample of what the first few rows of an appropriately formatted Utility Manager CSV file might look like:
General Notes on CSV Files
- CSV (comma separated value) files are used to transfer spreadsheet based or tabular data between applications. Each row from a spreadsheet or table is mapped to a line in the CSV file. Within each row, commas separate data corresponding to consecutive columns. When an application reads a CSV file, it uses the commas to separate the data and recreate the original columns.
- Many applications can produce data in CSV format. A common source for CSV files is Microsoft Excel. To generate a CSV file from an Excel spreadsheet, select the CSV option from Excel's Save As menu.
- Scope 5 expects CSV files to be identified with either a .txt or a .csv suffix.
- When generating a CSV file, beware of commas in the source file. When an application attempts to read the CSV file it may confuse commas present in the source file with those injected by the application generating the CSV file, resulting in errors. To avoid this problem:
- Format the source file to not use commas - in the case of Excel, it's easy to format columns to represent numbers without commas.
- Ensure that the application generating the CSV file encloses in double quotes any data that includes commas. Scope 5 will ignore commas within a double quoted string.
- TIP: If Scope 5 fails to load a CSV file and complains of formatting problems, inspect the CSV file in a text editor to be sure that the format is as expected.
Comments